 Admino
Instagram Smart Replies: Visual Setup Guide With Screenshots
Most auto-reply setup guides describe steps in general terms: 'create a rule,' 'define a keyword,' 'activate it.' But once you're actually inside the panel, the real question is which exact button, which tab, which toggle. This guide shows exactly that: 10 real steps, each with a direct screenshot from the Admino panel, from the moment you add an Instagram account to the moment your smart-reply rule — for both DMs and comments — is active and running.
The important part of this path is that a single rule can run on both incoming DMs and comments at once — you don't need to define the same logic twice for two separate channels. Below you'll see exactly where that choice happens (Step 6), alongside audience targeting (everyone vs. followers-only) and picking or creating the reply message.
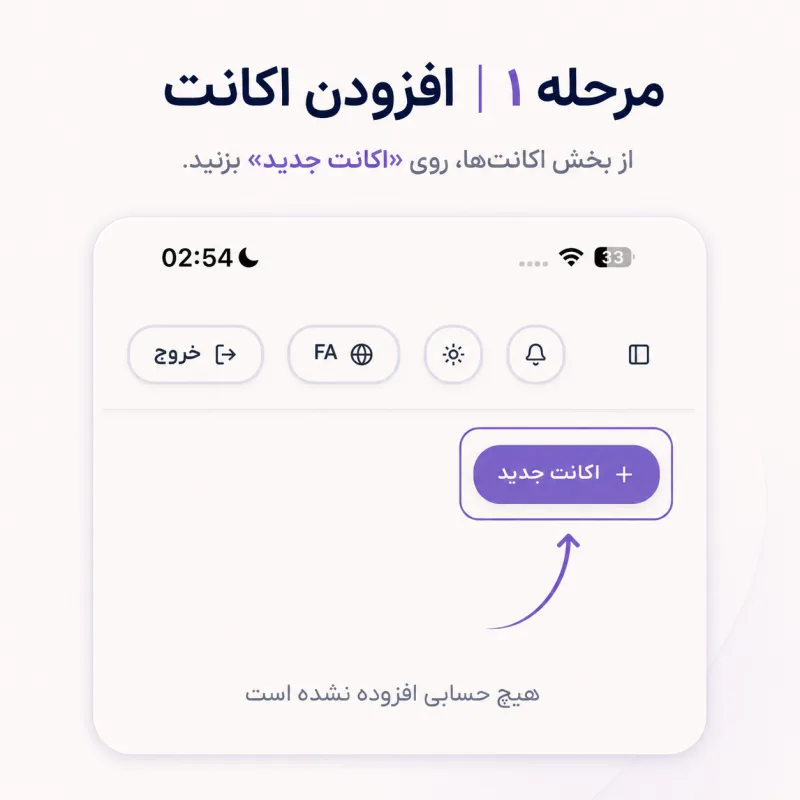
Step 1 | Add your Instagram account
The first step is connecting your Instagram business or creator account to your workspace. If you haven't added any account yet, the panel shows exactly that — a 'no account added yet' message next to a 'New account' button. This connection happens through Instagram's own official Business Login, so your password is only ever typed on Instagram's real login page, nowhere else.
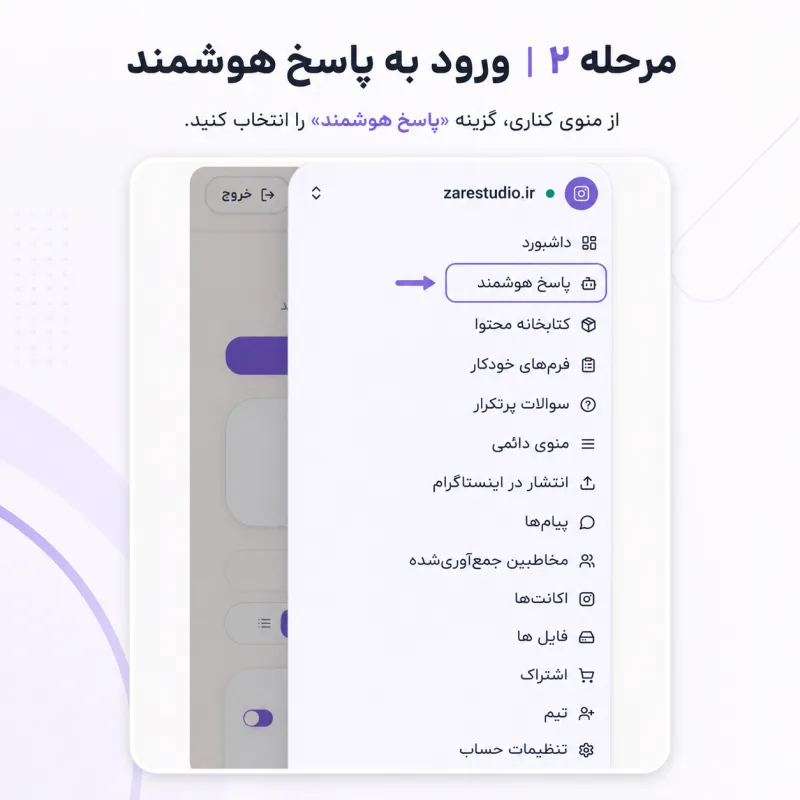
Step 2 | Open the Smart Reply section
Once the account is connected, you open the 'Smart Reply' section from the workspace sidebar. It sits alongside other sections like dashboard, content library, auto-forms, FAQ, persistent menu, publishing, messages, collected contacts, accounts, files, subscription, team, and account settings — smart reply is its own clearly labeled section, not a buried sub-setting somewhere else.
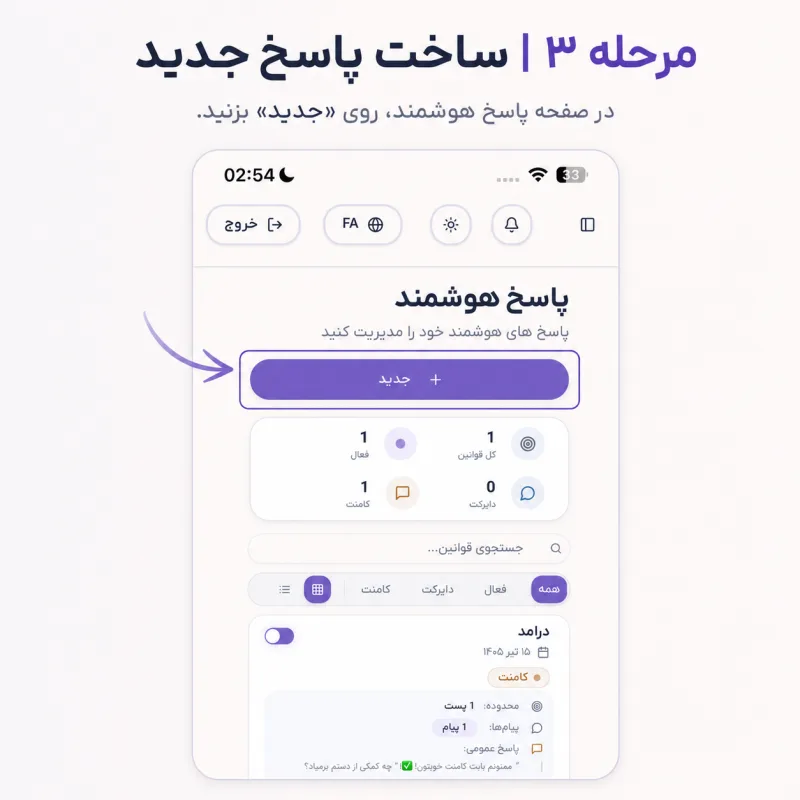
Step 3 | Create a new rule
The Smart Reply page shows your account's overall automation status at a glance: how many rules are active, the total rule count, and a breakdown of how many rules target comments versus DMs. If you've already built a rule (say, a sample one answering revenue questions), it shows up right there in the list. To start a fresh rule, you just click the 'New +' button.
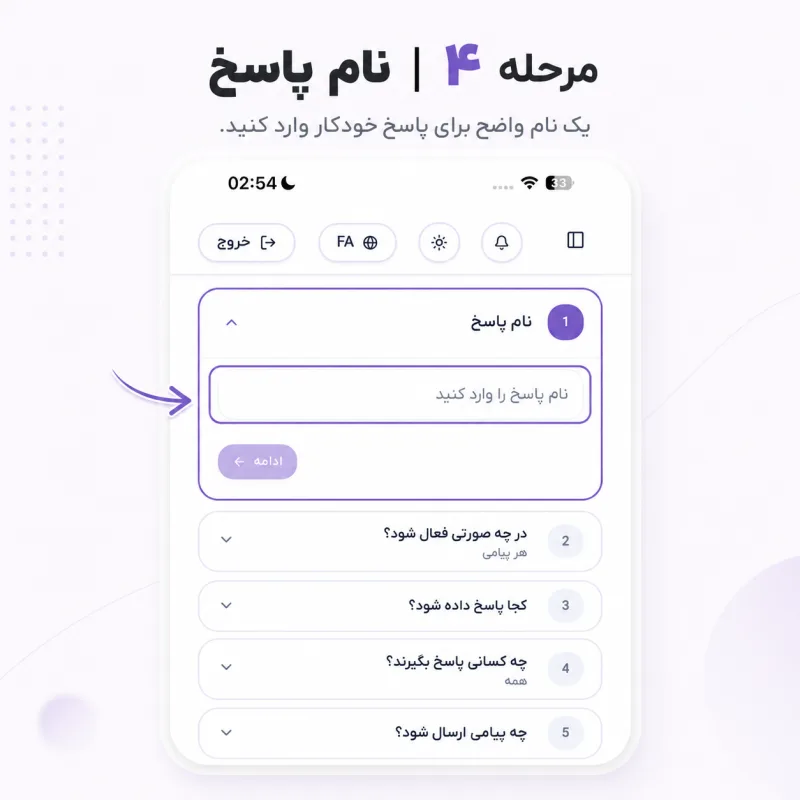
Step 4 | Name the rule
The first field you fill in is the rule's name — something like 'Product price reply' or 'Shipping info.' This name is purely internal, for you and your team; it's never shown anywhere in the actual message the recipient sees. Still, a clear name saves real time once you have several rules and need to quickly find one or review priority order.
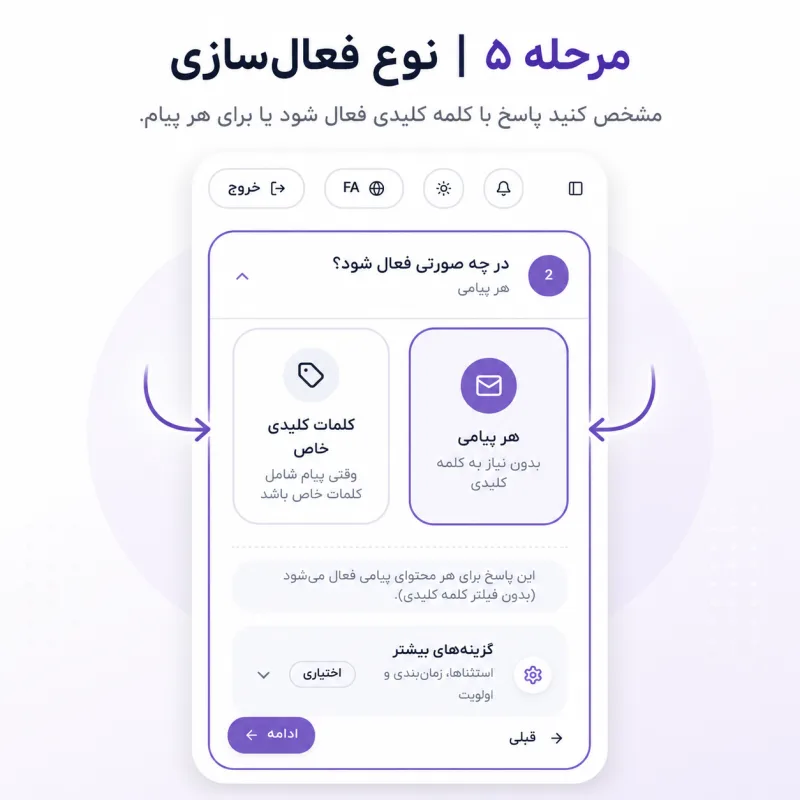
Step 5 | Choose the activation type
This is where you make the rule's core logic decision: should it fire only when 'specific keywords' appear in the message or comment (e.g. 'price' or 'stock'), or should it reply to 'any message' regardless of content? For most businesses, specific keywords is the better choice — it lets you build several separate rules for several different repeated questions without the replies colliding with each other.
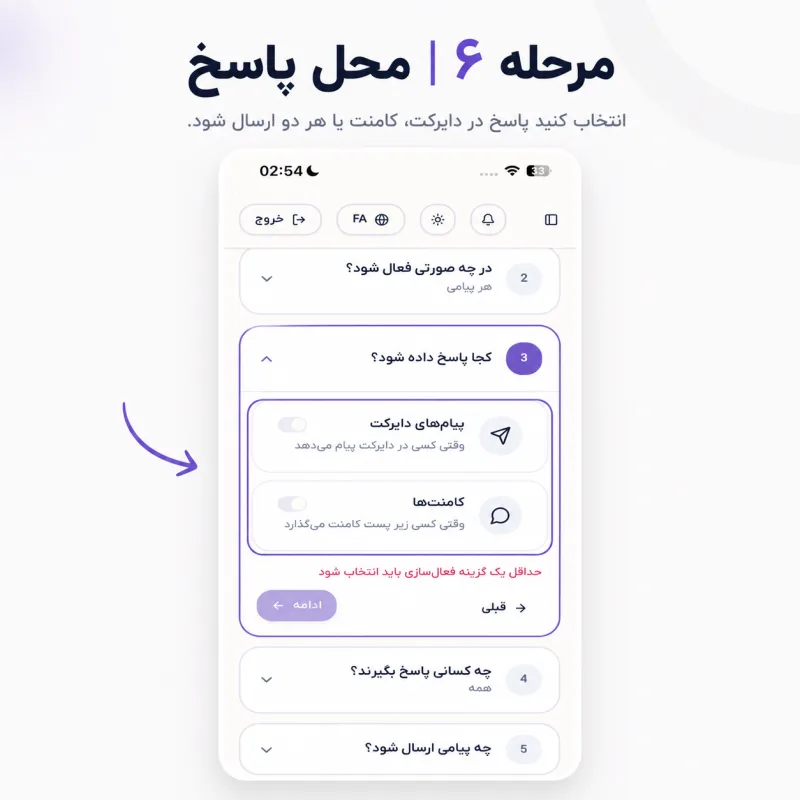
Step 6 | Choose where the rule runs: DM, comments, or both
This is the step that separates this guide from a purely-DM or purely-comments walkthrough. Here you see two separate toggles — one for 'direct messages' and one for 'comments.' You can switch both on at once, so the exact same rule runs on incoming DMs and on comments under your posts, or you can leave just one on if your reply logic genuinely needs to differ per channel.
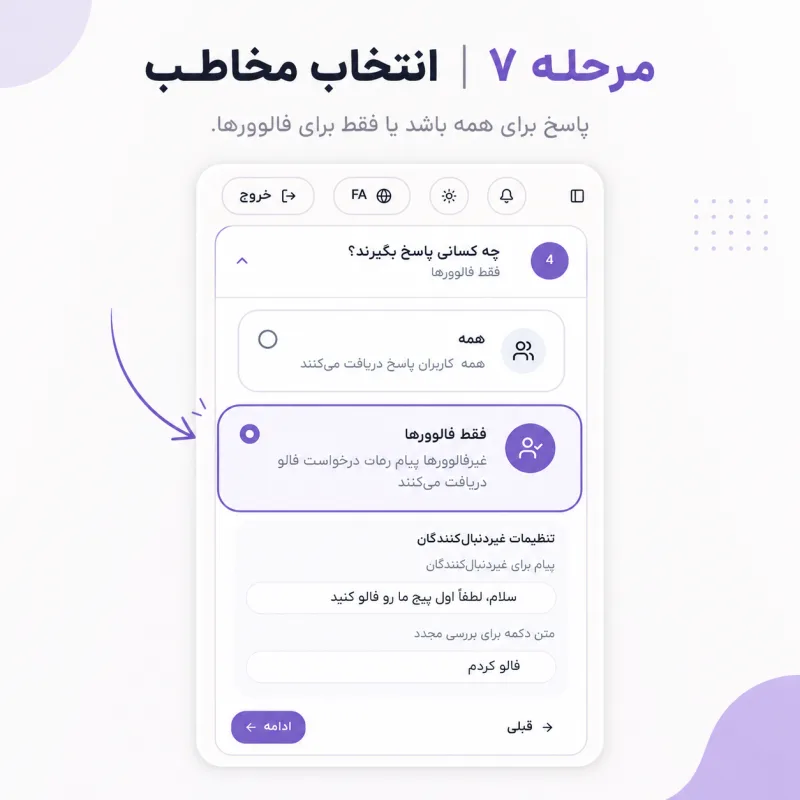
Step 7 | Choose the audience: everyone or followers-only
This step defines who the rule applies to: 'everyone' who messages or comments, or 'followers only.' Choosing followers-only opens a dedicated non-follower settings section — in that case, someone who isn't yet following gets a follow-prompt message first instead of the real reply, and only receives the actual answer once they follow.
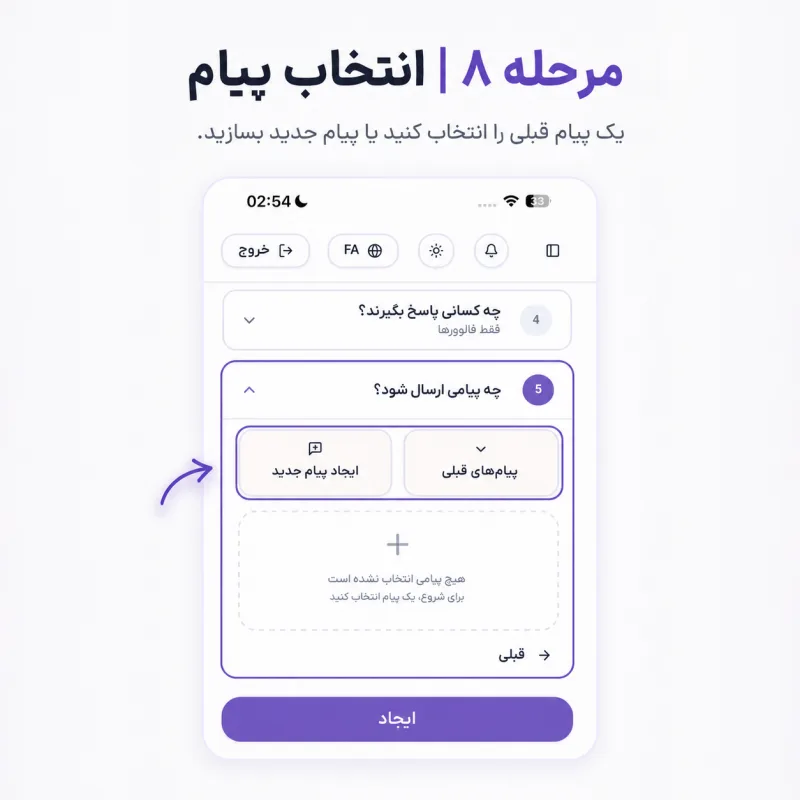
Step 8 | Choose the reply message
Now you decide what message actually gets sent once the rule fires. You get two choices: 'create a new message' or pick from 'previous messages' you've already built for this account. If you're just starting out and have no message yet, you naturally go with creating a new one — exactly what the next step shows.
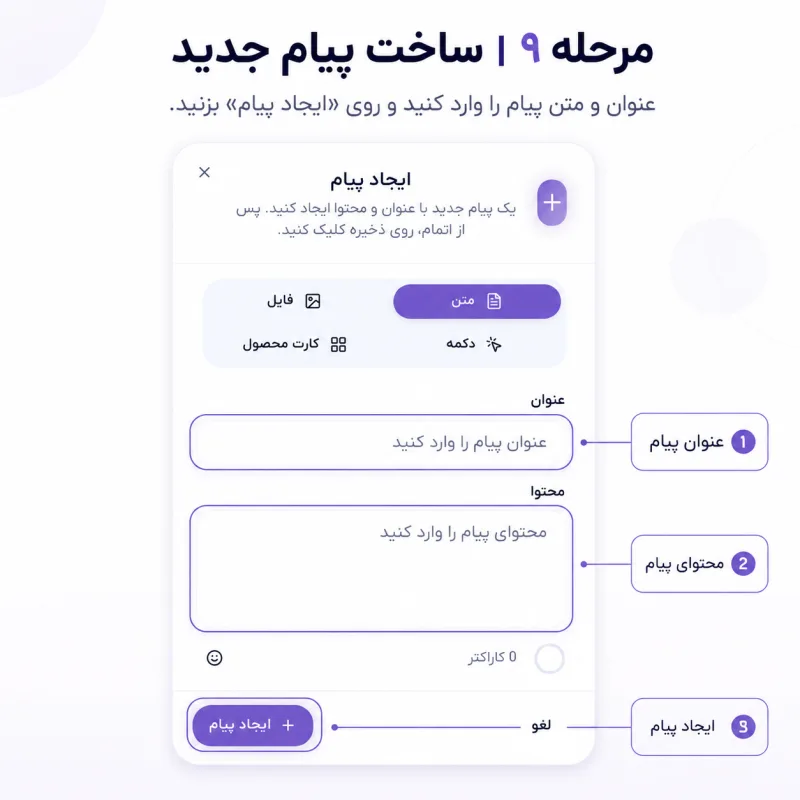
Step 9 | Create the new message
The message-creation form has two main fields: a title (for internal identification, similar to the rule name) and the actual message content the recipient receives. The core advice lives right here: keep the reply short, clear, and human — answering exactly the question implied by Step 5's keyword, not a vague generic reply. This same message can later be reused for other rules from the 'previous messages' list.
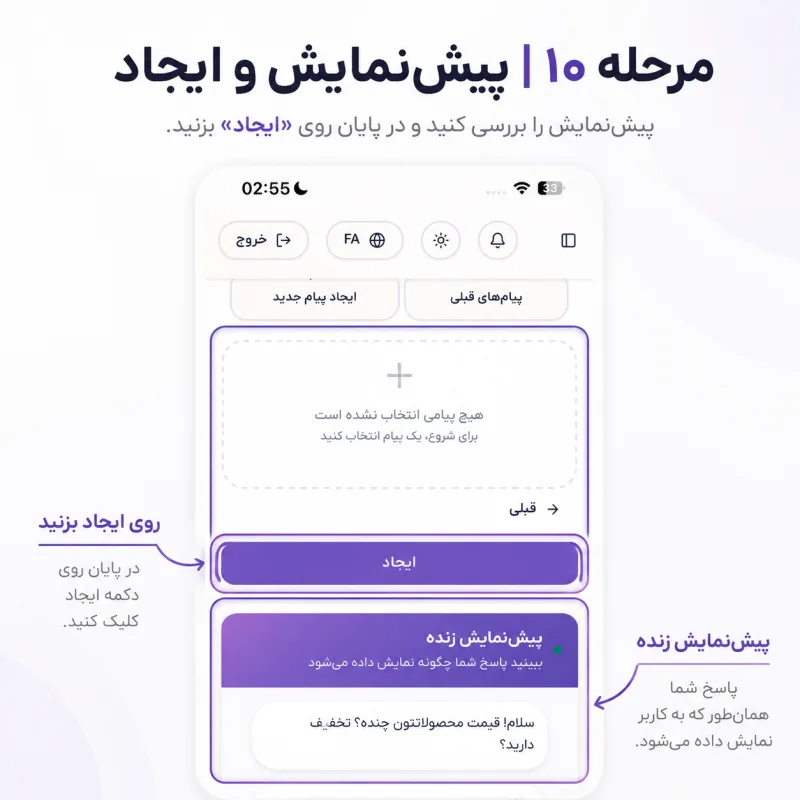
Step 10 | Preview and final creation
The last step is a live preview of the reply — shown exactly as the recipient would see it in their own DM thread, including a sample incoming message ("Hi! What are your prices? Any discounts?") and the reply your rule sends back. This is the best moment for one final check: does the tone match your page? Does it actually answer the question the keyword implies? Once satisfied, clicking "Create" saves and activates the rule.
A rule that covers both DMs and comments with one shared logic doesn't need double the setup — it just needs both toggles switched on at the right step.
After activation: confirming the rule actually works
Right after creating the rule, the best move is sending a test message or comment with the same keyword from a different Instagram account (never your own page). If a reply arrives within moments, the rule is working. If not, work through the troubleshooting list below in order — it almost always covers the real cause.
- The account's automation itself is switched off — check that separately from the rule's own status.
- The keyword isn't exactly what real people type — add spelling variants and colloquial phrasing of the same word.
- In Step 6, only one of the DM/comments toggles stayed on — if you expect replies on both channels, both need to be enabled.
- In Step 7 you chose followers-only and your test account isn't following yet — either follow first, or temporarily switch to everyone for testing.
- Another rule with higher priority already claimed the message — review the rule priority order on the Smart Reply list.
- You tested from the page's own account — a page's own messages are always ignored.
Frequently asked questions about this walkthrough
Do I have to enable both DM and comments together?
No, it's entirely optional. Step 6 lets you keep just one channel switched on. But if the exact same question (say, pricing) shows up both under your posts and in DMs, enabling both with one shared rule saves more time than building two separate rules.
What if I don't have a message ready yet?
That's exactly what the flow in Steps 8 and 9 is built for. Choose 'create a new message,' write the title and reply text, and that same message becomes available for future rules from the 'previous messages' list from then on.
Is Step 10's preview exactly what the recipient sees?
Yes — the live preview is built from the exact reply text you wrote in Step 9 and displayed the way it would appear in the recipient's own DM thread. If you edit the reply text after activation, future messages go out using the updated version.
Conclusion
Once you see the real panel steps in order, building your first Instagram smart-reply rule takes a few minutes: add your account, open Smart Reply, create a new rule, name it, choose the activation type, choose where it runs (DM, comments, or both), choose the audience, pick or create the reply message, and finally preview and create. Step 6 is the real takeaway — one rule can run on both channels at once, with no duplicated setup.
Smart DMs & Auto-Replies
Reply automatically to repetitive Instagram DMs and comments using keyword, priority, and time-window rules.
Explore this featureReady to get started today?
Connect your Instagram account and let Admino handle your DMs, comments, and publishing.
See pricing